Board Start-Up Guide MistySOM
Requirements
- For Windows:
- TerasTerm (link to download)
- For Linux:
- root permissions (sudo)
- (use your distribution's package manager to install the following utilities):
- screen
- dd
- pv
Booting Flash Writer
-
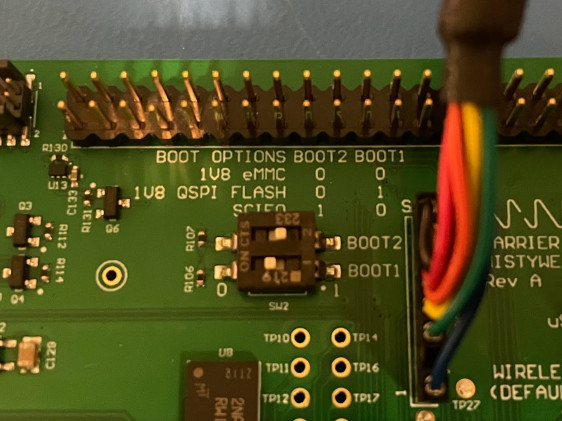
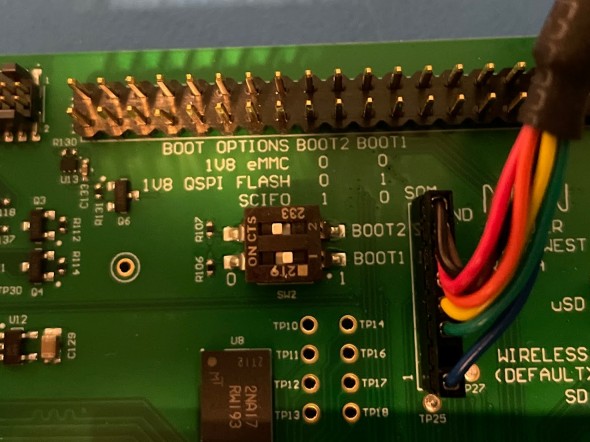
Set the boot mode to SCIF. On the MistySOM Carrier board, on SW2, set BOOT1 OFF and BOOT2 to ON.
-
Connect the
FTDI cabletoJ40on the MistyCarrier board and a USB port on the computer -
On Windows:
- Start TeraTerm and select the
COMn: USB Serial Port (COMn)interface. - Set the Baud rate under
Setup -> Serial Port... -> Speed:to115200and click theNew Settingbutton.
On Linux: Open a terminal and run the command:
sudo screen /dev/ttyUSB0 115200 - Start TeraTerm and select the
-
Power on the MistySOM board.
-
Upon application of power and turning the unit on with the
PWR_ONswitch, you should see the following on your terminal window:(C) Renesas Electronics Corp. -- Load Program to SystemRAM --------------- please send ! -
Download and save the file
Flash_Writer_SCIF__.mot(MistySOM-G2L or MistySOM-V2L) by clicking on Raw button and then using Save as over the opened content. -
In TeraTerm (on Windows): Select
File -> Send File...and select the fileFlash_Writer_SCIF__.mot. A transfer dialog will appear displaying the progress of the file transfer over the serial connection.
On Linux: Open another terminal window and run the command:pv Flash_Writer_SCIF__.mot | sudo dd of=/dev/ttyUSB0
After successful downloading of the binary, Flash Writer starts automatically and shows a message like the one shown below on the terminal
Flash writer for RZ/V2 Series V1.02 Nov.15,2021
 Product Code : RZ/V2L
>
Writing Bootloader
For the boot operation, two boot loader files need to be written to the target board.
Type XLS2 and confirm with [ENTER]:
Enter the top address 11E00
and the Qspi address 00000:
>XLS2
===== Qspi writing of RZ/G2 Board Command =============
Load Program to Spiflash
Writes to any of SPI address.
Micron : MT25QU512
Program Top Address & Qspi Save Address
===== Please Input Program Top Address ============
Please Input : H'11E00
===== Please Input Qspi Save Address ===
Please Input : H'00000
Work RAM(H'50000000-H'53FFFFFF) Clear....
please send ! ('.' & CR stop load)
Send the data of “bl2_bp-MistySOMG2L.srec” (download for MistySOM-G2L or MistySOM-V2L) from terminal software after the message “please send !” is shown.
After the successful download of the binary, messages like below are shown on the terminal.
SPI Data Clear(H'FF) Check :H'00000000-0000FFFF Erasing..Erase Completed
SAVE SPI-FLASH.......
======= Qspi Save Information =================
SpiFlashMemory Stat Address : H'00000000
SpiFlashMemory End Address : H'00009A80
===========================================================

SPI Data Clear(H'FF) Check : H'00000000-0000FFFF,Clear OK?(y/n)
In case a message prompt to clear data like the above appears, please enter “y”.
Next, write another loader file by using the XLS2 command again.
With top address 00000
and Qspi address 1D200:
>XLS2
===== Qspi writing of RZ/G2 Board Command =============
Load Program to Spiflash
Writes to any of SPI address.
Micron : MT25QU512
Program Top Address & Qspi Save Address
===== Please Input Program Top Address ============
Please Input : H'00000
===== Please Input Qspi Save Address ===
Please Input : H'1D200
Work RAM(H'50000000-H'53FFFFFF) Clear....
please send ! ('.' & CR stop load)
Send the data of “fip-MistySOMG2L.srec”(download for MistySOM-G2L or MistySOM-V2L) from terminal software after the message “please send !” is shown.
After the successful download of the binary, messages like below are shown on the terminal.
SPI Data Clear(H'FF) Check :H'00000000-0000FFFF Erasing..Erase Completed
SAVE SPI-FLASH.......
======= Qspi Save Information =================
SpiFlashMemory Stat Address : H'0001D200
SpiFlashMemory End Address : H'000CC73F

SPI Data Clear(H'FF) Check : H'00000000-0000FFFF,Clear OK?(y/n)
In case a message to prompt to clear data like the above appears, please enter “y”.
After writing two loader files normally, pull the power cable to the board and set SW2 into QSPI boot mode:
-
BOOT1 ON
-
BOOT2 OFF

Configure U-Boot
Reapply power to the board and turn it on with the PWR_ON switch.
The following will appear on the terminal::
þÿNOTICE:  BL2: v2.5(release):v2.5/rzg2l-1.00-49-g7b68034f7
NOTICE:  BL2: Built : 18:44:43, Dec  7 2022
NOTICE:  BL2: Booting BL31
NOTICE:  BL31: v2.5(release):v2.5/rzg2l-1.00-49-g7b68034f7
NOTICE:  BL31: Built : 18:44:43, Dec  7 2022


U-Boot 2021.10-g8a08fc7390 (Dec 07 2022 - 10:44:16 -0800)

CPU:   Renesas Electronics K rev 16.15
Model: smarc-rzg2l
DRAM:  1.9 GiB
MMC:   sd@11c00000: 0, sd@11c10000: 1
Loading Environment from MMC... *** Warning - bad CRC, using default environment

In:    serial@1004b800
Out:   serial@1004b800
Err:   serial@1004b800
Net:   No ethernet found.

Hit any key to stop autoboot:  0
## Resetting to default environment
Card did not respond to voltage select! : -110
** No partition table - mmc 0 **
Couldn't find partition mmc 0:1
Can't set block device
** No partition table - mmc 0 **
Couldn't find partition mmc 0:1
Can't set block device
Error: Bad gzipped data
Bad Linux ARM64 Image magic!
=>
the bottom prompt => indicates the U-Boot prompt.
Enter
=> env default -a
## Resetting to default environment
=> saveenv
Saving Environment to MMC... Writing to MMC(0)....OK
=>
to reset the values to a defined default state, ready for custom configuration.
After the SDcard has been prepared and inserted, set the boot variables on the U-boot prompt with:
For MistySOM-G2L:
=> setenv bootcmd 'mmc dev 1;fatload mmc 1:1 0x48080000 Image;fatload mmc 1:1 0x48000000 r9a07g044l2-smarc.dtb; booti 0x48080000 - 0x48000000'
=> setenv bootargs 'root=/dev/mmcblk1p2 rootwait'
For MistySOM_V2L:
=> setenv bootcmd 'mmc dev 1;fatload mmc 1:1 0x48080000 Image;fatload mmc 1:1 0x48000000 r9a07g054l2-smarc.dtb; booti 0x48080000 - 0x48000000'
=> setenv bootargs 'root=/dev/mmcblk1p2 rootwait'
Confirm with
=> saveenv
power cycle the board and it should now boot up to a Linux prompt where you can log in with root
Poky (Yocto Project Reference Distro) 3.1.14 smarc-rzg2l ttySC0

smarc-rzg2l login: root
