Preparing uSD Card Instructions
Important: Before doing anything, identify the correct uSD device
The following instructions are destructive and will clear the previously written data. So please ensure the device name you are using.
Identify the block device name for the SD Card with the command below. It is usually in the format of "/dev/sdX"
sudo fdisk -l
Use Partitioned Image
You can use the command below to write the whole partitioned image into your uSD card:
MistySOM-G2L
pv mistysom-image-smarc-rzg2l.wic.bz2 | bzcat | sudo dd bs=4M of=/dev/sdX
or if you don't have the pv package installed and you don't care about a progress bar, you can change the command like below:
bzcat mistysom-image-smarc-rzg2l.wic.bz2 | sudo dd bs=4M status=progress of=/dev/sdX
MistySOM-V2L
pv mistysom-image-smarc-rzv2l.wic.bz2 | bzcat | sudo dd bs=4M of=/dev/sdX
or if you don't have the pv package installed and you don't care about a progress bar, you can change the command like below:
bzcat mistysom-image-smarc-rzv2l.wic.bz2 | sudo dd bs=4M status=progress of=/dev/sdX
NOTE: For V2L and G2L, the above commands automatically create a partition table, 300 MB of FAT partition, and 900 MB of EXT4 partition. So it doesn't use the whole capacity of your uSD Card. If you need the whole capacity, you can resize the EXT4 partition with the command below:
resize2fs /dev/sdX2
If you are planning to use the eMMC storage, it is recommended to resize the partition after you have copied the partition to the eMMC storage.
Manual Approach
Partition and Format the uSD
The uSD card should be formatted with two partitions, FAT32 and EXT4. Parted provides a terminal utility to do this, alternatively gparted or another graphical partition editor can be used from the GUI.
- Install the tool (the example below applies to Ubuntu or Debian-based systems, use the package manager of your distribution accordingly)
sudo apt update
sudo apt install parted
- Identify the block device name for the SD Card, for example "/dev/sdc"
sudo fdisk -l
- Create the partition table with a FAT32 and an EXT4 partition
sudo parted /dev/sdc --script -- mklabel gpt
sudo parted /dev/sdc --script -- mkpart primary fat32 0% 30MiB
sudo parted /dev/sdc --script -- mkpart primary ext4 30MiB 100%
- Format the partitions to FAT32 and EXT4
sudo mkfs.fat -F 32  /dev/sdc1
sudo mkfs.ext4 -F /dev/sdc2
- Confirm the partition table is set as expected
sudo parted /dev/sdc --script print
Expected output:
Model: SD EB1QT (sd/mmc)
Disk /dev/sdc: 32.0GB
Sector size (logical/physical): 512B/512B
Partition Table: gpt
Disk Flags:

Number  Start   End     Size    File system  Name     Flags
 1      1049kB  31.5MB  30.4MB  fat32        primary  msftdata
 2      31.5MB  32.0GB  32.0GB  ext4         primary
Load files to the uSD card
After the uSD card has been prepared, mount the two partitions and copy the following files:
MistySOM-G2L
- Linux kernel to the first partition (FAT32):
sudo cp /path/to/output/imges/smarc-rzg2l/Image-smarc-rzg2l.bin /path/to/mountpart1/Image
- Device tree blob to the first partition (FAT32)
sudo cp /path/to/output/imges/smarc-rzg2l/r9a07g044l2-smarc.dtb /path/to/mountpart1/
- Root filesystem to the second partition (ext4)
sudo cp /path/to/output/imges/smarc-rzg2l/<image-name>-smarc-rzg2l.tar.bz2 /path/to/mountpart2/
cd /path/to/mountpart2/
tar -xvf <image-name>-smarc-rzv2l.tar.bz2
MistySOM-V2L
- Linux kernel to the first partition (FAT32):
sudo cp /path/to/output/imges/smarc-rzv2l/Image-smarc-rzv2l.bin /path/to/mountpart1/Image
- Device tree blob to the first partition (FAT32)
sudo cp /path/to/output/imges/smarc-rzv2l/r9a07g054l2-smarc.dtb /path/to/mountpart1/
- Root filesystem to the second partition (ext4)
sudo cp /path/to/output/imges/smarc-rzv2l/<image-name>-smarc-rzv2l.tar.bz2 /path/to/mountpart2/
cd /path/to/mountpart2/
tar -xvf <image-name>-smarc-rzv2l.tar.bz2
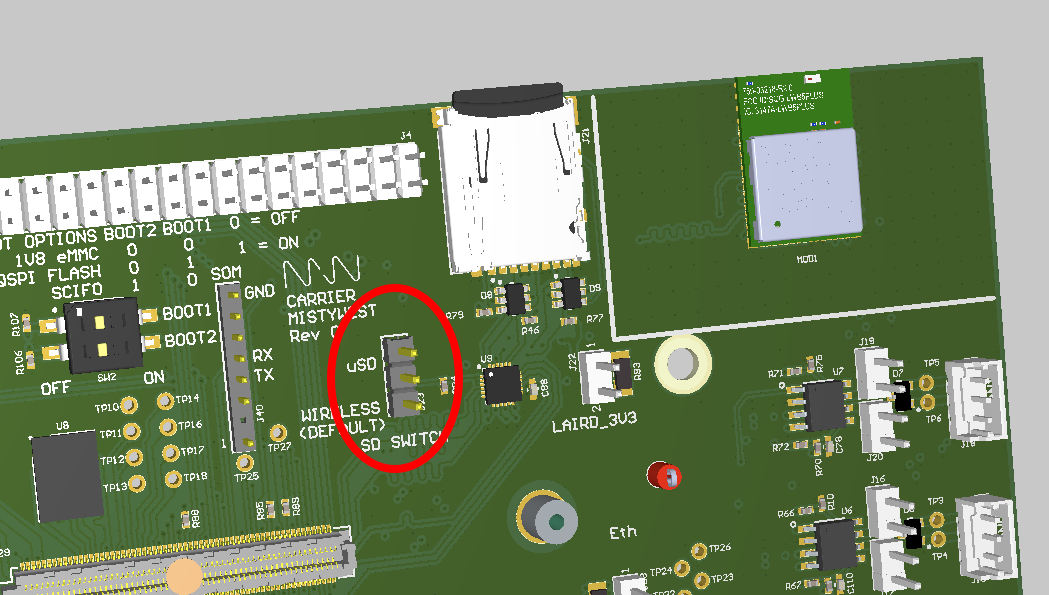
NOTE: For V2L and G2L, after this, your uSD card is ready to be inserted into the MistyCarrier uSD slot. In order to be able to boot from the SD card, please make sure that jumper J23 is set to the uSD (pins 1&2) position. Jumper J23 is located under the uSD card slot, a bit to the left as seen in the picture below and has two positions, uSD and WIRELESS: 
Note to WSL users:
Make sure to work with files on Linux mounts (avoid the use of mounted Windows partitions)